> ## Documentation Index
> Fetch the complete documentation index at: https://docs.primeintellect.ai/llms.txt
> Use this file to discover all available pages before exploring further.
# Provision Instance
> How to provision an instance using availability data
Before you start, ensure that you have [API Key](./api-keys) with `Instances -> Read and write` permission
## Retrieving offers from the availability API
For an in-depth guide to using the availability endpoint, refer to [This Guide](./check-gpu-availability)
Our goal is to provision H100 GPU using availability data. First, we need to call the availability endpoint to get the current offers:
```bash theme={null}
curl --request GET \
--url 'https://api.primeintellect.ai/api/v1/availability/gpus?gpu_type=H100_80GB®ions=united_states®ions=canada&gpu_count=1' \
--header 'Authorization: Bearer your_api_key'
```
We will use the Hyperstack provider and the following offer:
```json theme={null}
{
"cloudId": "n3-H100x1",
"gpuType": "H100_80GB",
"socket": "PCIe",
"provider": "hyperstack",
"dataCenter": "CANADA-1",
"country": "CA",
"gpuCount": 1,
"gpuMemory": 80,
"disk": {
"minCount": null,
"defaultCount": 100,
"maxCount": null,
"pricePerUnit": null,
"step": null,
"defaultIncludedInPrice": null,
"additionalInfo": null
},
"vcpu": {
"minCount": null,
"defaultCount": 180,
"maxCount": null,
"pricePerUnit": null,
"step": null,
"defaultIncludedInPrice": null,
"additionalInfo": null
},
"memory": {
"minCount": null,
"defaultCount": 180,
"maxCount": null,
"pricePerUnit": null,
"step": null,
"defaultIncludedInPrice": null,
"additionalInfo": null
},
"internetSpeed": null,
"interconnect": null,
"interconnectType": null,
"provisioningTime": null,
"stockStatus": "Available",
"security": "secure_cloud",
"prices": {
"onDemand": 1.9,
"isVariable": null,
"currency": "USD"
},
"images": [
"ubuntu_22_cuda_12",
"cuda_12_1_pytorch_2_2",
"cuda_11_8_pytorch_2_1",
"stable_diffusion",
"flux",
"axolotl",
"bittensor",
"vllm_llama_8b",
"vllm_llama_70b",
"vllm_llama_405b"
],
"isSpot": null,
"prepaidTime": null
}
```
This GPU configuration has fixed resources, so we don't have to worry about those and just use the default ones.
## Creating the Instance Request Body
First, lets go through the [**Create Pod**](./pods/create-pod) endpoint and explain how it works. The request requires a `body` with `pod`, `provider` and optional `team` definitions.
### `pod`
The `pod` object defines the instance’s characteristics:
```json theme={null}
"pod": {
"name": "My first pod",
"cloudId": "n3-H100x1",
"gpuType": "H100_80GB",
"socket": "PCIe",
"gpuCount": 1,
"image": "ubuntu_22_cuda_12",
"dataCenterId": "CANADA-1",
"country": "CA",
"security": "secure_cloud"
}
```
We can choose any `name`, but the rest of the parameters is copied from the availability offer. Since this offer includes a `dataCenterId` and `country`, we're going to pass those values during provisioning, as it indicates that the provider has GPUs with the same `cloudId` available in different locations. We also copy the rest of the GPU definition data:
* `gpuType -> gpuType`
* `socket -> socket`
* `gpuCount -> gpuCount`
* `security -> security`
Last thing to do is to select an `image`. Available values are stored within the `images` property of the availability offer. We're going to select the default `ubuntu_22_cuda_12` image.
### `provider`
```json theme={null}
"provider": {
"type": "hyperstack"
},
```
The `provider` object is straightforward, we only need to specify the `type`, which in our case is `hyperstack`.
### `team`
```json theme={null}
"team": {
"teamId": "my_team_id"
}
```
If you want to assign the pod to a specific `team`, include the team object.
You can find the `teamId` on your [Team's Profile page](https://app.primeintellect.ai/dashboard/team-profile)
### `sharedWithTeam`
```json theme={null}
"sharedWithTeam": true
```
Set to `true` to share the instance with **all members** of the team. When enabled, every team member's SSH keys are added to the instance, giving them direct access. Requires `team.teamId` to be set.
### `teamMemberIds`
```json theme={null}
"teamMemberIds": ["clvb1jtmk0001pxfv1abc2def", "clvb2kumr0002qygw3bcd4efg"]
```
Alternatively, provide a list of specific user IDs to share the instance with. Only those members' SSH keys will be added. Use the [List Team Members](./teams) endpoint to get user IDs.
You can use either `sharedWithTeam` for all members or `teamMemberIds` for specific members. If both are provided, `sharedWithTeam` takes precedence.
## Sending the Create Request
With all parts configured, the final request looks like this:
```bash theme={null}
curl --request POST \
--url https://api.primeintellect.ai/api/v1/pods/ \
--header 'Authorization: Bearer your_api_key' \
--header 'Content-Type: application/json' \
--data '{
"pod": {
"name": "My first pod",
"cloudId": "n3-H100x1",
"gpuType": "H100_80GB",
"socket": "PCIe",
"gpuCount": 1,
"image": "ubuntu_22_cuda_12",
"dataCenterId": "CANADA-1",
"country": "CA",
"security": "secure_cloud"
},
"provider": {
"type": "hyperstack"
}
}'
```
On successful completion, you should receive a `200 OK` response with the pod details in the [Response Body](./pods/create-pod).
## Modifying instance resources
If the availability offer allows resource customization, you can adjust the default resources during provisioning. Below is an example of a modified resource configuration:
```json theme={null}
"disk": {
"minCount": 50,
"defaultCount": 100,
"maxCount": 1000,
"pricePerUnit": 0.0003,
"step": 10,
"defaultIncludedInPrice": false,
"additionalInfo": null
},
"vcpu": {
"minCount": 4,
"defaultCount": 16,
"maxCount": 32,
"pricePerUnit": 0.004,
"step": 2,
"defaultIncludedInPrice": true,
"additionalInfo": null
},
```
This configuration enables changes to `disk` and `vcpu` specifications.
Be aware that default `vcpu` is included in price (`defaultIncludedInPrice` set to `true`) the default disk is not, which results in an **additional cost of \$0.03** when using the default disk size.
### Increase disk size
To increase the disk size, set a new value in the `pod` property when sending the create request. For this example, since the provider supports increments of **10** with a minimum of **50**, we'll set the disk size to **200**. This adjustment will affect the total hourly cost as follows:
```
GPU cost: $2.69
vcpu cost: $0.00 (we're not paying for vcpu because `defaultIncludedInPrice == true`)
memory cost: $0.00
disk cost: $0.06 (200 units * $0.0003)
Total cost: $2.75
```
So the final request will look like:
```bash theme={null}
curl --request POST \
--url https://api.primeintellect.ai/api/v1/pods/ \
--header 'Authorization: Bearer your_api_key' \
--header 'Content-Type: application/json' \
--data '{
"pod": {
"name": "My first pod",
"cloudId": "n3-H100x1",
"gpuType": "H100_80GB",
"socket": "PCIe",
"gpuCount": 1,
"image": "ubuntu_22_cuda_12",
"dataCenterId": "CANADA-1",
"country": "CA",
"security": "secure_cloud",
"diskSize": 200
},
"provider": {
"type": "hyperstack"
}
}'
```
### Modifying vcpu
This case is a little more complicated. Because `defaultIncludedInPrice` allows us to use default of **16 vcpus for free**, there are 2 options in which we're going to pay additional amount for vcpus
#### Increasing vcpu
Raising `vcpu` to **20** will increase the cost beyond the base instance price:
```
GPU cost: $2.69
vcpu cost: $0.08 (20 units * $0.004)
memory cost: $0.00
disk cost: $0.03 (100 units[default] * $0.0003)
Total cost: $2.80
```
#### Decreasing vcpu
Reducing `vcpu` to **10** can also increase costs compared to the default configuration. This is because some servers use predefined containers, and altering configurations may incur additional fees, making it more economical to use the default setup:
```
GPU cost: $2.69
vcpu cost: $0.04 (10 units * $0.004)
memory cost: $0.00
disk cost: $0.03 (100 units[default] * $0.0003)
Total cost: $2.76
```
### Example request with adjusted disk and vcpu
With both `disk` and `vcpu` increased our request will look like:
```bash theme={null}
curl --request POST \
--url https://api.primeintellect.ai/api/v1/pods/ \
--header 'Authorization: Bearer your_api_key' \
--header 'Content-Type: application/json' \
--data '{
"pod": {
"name": "My first pod",
"cloudId": "n3-H100x1",
"gpuType": "H100_80GB",
"socket": "PCIe",
"gpuCount": 1,
"image": "ubuntu_22_cuda_12",
"dataCenterId": "CANADA-1",
"country": "CA",
"security": "secure_cloud",
"diskSize": 200,
"vcpus": 20
},
"provider": {
"type": "hyperstack"
}
}'
```
and the total cost breakdown is as follows:
```
GPU cost: $2.69
vcpu cost: $0.08 (20 units * $0.004)
memory cost: $0.00
disk cost: $0.06 (200 units[default] * $0.0003)
Total cost: $2.83
```
## Dynamic pricing
Certain offers feature dynamic pricing, meaning that rates may fluctuate throughout the instance’s lifetime due to factors such as:
* Price being pegged to a foreign currency and fluctuating with exchange rates
* Payment in alternative currencies or tokens
* Market-based pricing
If an offer supports dynamic pricing, `prices -> isVariable` will be set to `true`. In this case, it’s recommended to specify a `maxPrice` when provisioning the instance to set a cap:
```bash theme={null}
curl --request POST \
--url https://api.primeintellect.ai/api/v1/pods/ \
--header 'Authorization: Bearer your_api_key' \
--header 'Content-Type: application/json' \
--data '{
"pod": {
"name": "My first pod",
"cloudId": "n3-H100x1",
"gpuType": "H100_80GB",
"socket": "PCIe",
"gpuCount": 1,
"image": "ubuntu_22_cuda_12",
"dataCenterId": "CANADA-1",
"country": "CA",
"security": "secure_cloud",
"maxPrice": 2.70,
},
"provider": {
"type": "hyperstack"
}
}'
```
This configuration limits provisioning to instances at or below the specified price. However, **prices may still vary during the instance’s lifetime**.
## Using Custom Templates
When creating an instance, you may want to use your own custom environment instead of the options available through the availability endpoint. You can select from any public templates or your private ones, which you can view on the [Templates Page](https://app.primeintellect.ai/dashboard/templates).
To use a custom template, you need to copy its `customTemplateId` and set the `image` to `custom_template`.
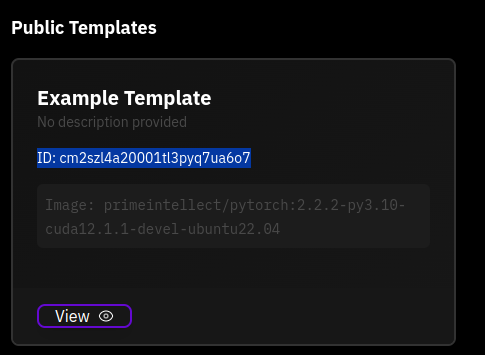 Here's an example request to use a custom template:
```bash theme={null}
curl --request POST \
--url https://api.primeintellect.ai/api/v1/pods/ \
--header 'Authorization: Bearer your_api_key' \
--header 'Content-Type: application/json' \
--data '{
"pod": {
"name": "My first pod",
"cloudId": "n3-H100x1",
"gpuType": "H100_80GB",
"socket": "PCIe",
"gpuCount": 1,
"image": "custom_template",
"customTemplateId": "cm2szl4a20001tl3pyq7ua6o7",
"dataCenterId": "CANADA-1",
"country": "CA",
"security": "secure_cloud"
},
"provider": {
"type": "hyperstack"
}
}'
```
Not all templates are compatible with every provider and GPU. Ensure the selected GPU matches the template's **GPU Requirements** before using it. These details are available in the template view by clicking **View** button, on the template card.
## Attaching Existing Disks
You can attach existing disks with persisted data when provisioning a new GPU instance. This is particularly useful when you want to reuse datasets, models, or checkpoints stored on network-attached disks without re-uploading them.
### Finding Compatible GPUs
Before provisioning, use the [availability endpoint](./check-gpu-availability) with the `disks` filter to find GPU instances that can attach to your existing disks:
```bash theme={null}
curl --request GET \
--url 'https://api.primeintellect.ai/api/v1/availability/gpus?disks=clhxy6aw80000j8080gdf8kqv&gpu_type=H100_80GB' \
--header 'Authorization: Bearer your_api_key'
```
This returns only GPU offers available in the same location as your disk.
### Provisioning with Disks
To attach disks when creating an instance, add the `disks` array to your request body:
```bash theme={null}
curl --request POST \
--url https://api.primeintellect.ai/api/v1/pods/ \
--header 'Authorization: Bearer your_api_key' \
--header 'Content-Type: application/json' \
--data '{
"pod": {
"name": "Training instance with data",
"cloudId": "n3-H100x1",
"gpuType": "H100_80GB",
"socket": "PCIe",
"gpuCount": 1,
"image": "ubuntu_22_cuda_12",
"dataCenterId": "CANADA-1",
"security": "secure_cloud"
},
"provider": {
"type": "hyperstack"
},
"disks": ["clhxy6aw80000j8080gdf8kqv"]
}'
```
### Response
On successful provisioning, you'll receive a response with the instance details and attached disk information:
```json theme={null}
{
"id": "11de9260fb52451085f3936c20b0ffdb",
"userId": "clvb0itli0000oxevorvgrpfn",
"teamId": null,
"walletId": "clvb0iv0c0004oxev5mnt1xiv",
"name": "Training instance with data",
"providerType": "hyperstack",
"status": "PROVISIONING",
"installationStatus": "PENDING",
"installationFailure": null,
"installationProgress": null,
"createdAt": "2025-11-07T23:36:36.391000",
"updatedAt": "2025-11-07T23:36:36.418000",
"terminatedAt": null,
"gpuName": "H100_80GB",
"gpuCount": 1,
"socket": "PCIe",
"priceHr": 1.9,
"stoppedPriceHr": null,
"provisioningPriceHr": 0.0,
"environmentType": "ubuntu_22_cuda_12",
"customTemplateId": null,
"clusterId": null,
"primePortMapping": [
{
"internal": "22",
"external": "22",
"protocol": "TCP",
"usedBy": "SSH",
"description": "SSH access"
},
{
"internal": "*",
"external": "*",
"protocol": "TCP",
"usedBy": null,
"description": "All other ports"
}
],
"sshConnection": null,
"ip": null,
"resources": {
"memory": 180,
"disk": 1250,
"sharedDisk": null,
"vcpus": 28
},
"attachedResources": [
{
"resourceType": "DISK",
"id": "clhxy6aw80000j8080gdf8kqv",
"status": "UNATTACHED",
"isDetachable": true,
"mountPath": "/data",
"resourcePath": "/dev/vdc",
"size": 500,
"isShared": false
},
{
"resourceType": "DISK",
"id": "ephemeral",
"status": "ATTACHED",
"isDetachable": false,
"mountPath": "/ephemeral",
"resourcePath": "/dev/vdb",
"size": 750,
"isShared": false
}
],
"isSpot": null,
"autoRestart": null
}
```
The response includes:
* **`attachedResources`**: Array showing both your persistent disk (`clhxy6aw80000j8080gdf8kqv`) and the ephemeral instance disk
* **`resources.disk`**: Total disk space including both persistent and ephemeral storage (500GB + 750GB = 1250GB)
* **Disk status**: `UNATTACHED` initially, will become `ATTACHED` once the instance is fully provisioned, and then `MOUNTED` when disk it mounted to the working directory.
The persistent disk will be automatically attached and mounted at `/data` once the instance completes provisioning. The ephemeral disk is immediately available at `/ephemeral`.
### Multiple Disks
You can attach multiple disks to a single instance:
```bash theme={null}
curl --request POST \
--url https://api.primeintellect.ai/api/v1/pods/ \
--header 'Authorization: Bearer your_api_key' \
--header 'Content-Type: application/json' \
--data '{
"pod": {
"name": "Multi-disk training",
"cloudId": "n3-H100x1",
"gpuType": "H100_80GB",
"socket": "PCIe",
"gpuCount": 1,
"image": "ubuntu_22_cuda_12",
"dataCenterId": "CANADA-1",
"country": "CA",
"security": "secure_cloud"
},
"provider": {
"type": "hyperstack"
},
"disks": [
"clhxy6aw80000j8080gdf8kqv",
"clhxy9bz50001j8080hdf9lrw"
]
}'
```
### Use Cases
* **Training with Large Datasets**: Attach disks containing preprocessed training data
* **Model Checkpointing**: Resume training from checkpoints stored on persistent disks
* **Shared Data Access**: Use multi-node compatible disks across multiple instances
* **Spot Instances**: Keeping your data when running spot instances
- Only disks you own can be attached to your instances
- Disks must be in an `ACTIVE` state
- Some providers may have limitations on the number of disks that can be attached
Here's an example request to use a custom template:
```bash theme={null}
curl --request POST \
--url https://api.primeintellect.ai/api/v1/pods/ \
--header 'Authorization: Bearer your_api_key' \
--header 'Content-Type: application/json' \
--data '{
"pod": {
"name": "My first pod",
"cloudId": "n3-H100x1",
"gpuType": "H100_80GB",
"socket": "PCIe",
"gpuCount": 1,
"image": "custom_template",
"customTemplateId": "cm2szl4a20001tl3pyq7ua6o7",
"dataCenterId": "CANADA-1",
"country": "CA",
"security": "secure_cloud"
},
"provider": {
"type": "hyperstack"
}
}'
```
Not all templates are compatible with every provider and GPU. Ensure the selected GPU matches the template's **GPU Requirements** before using it. These details are available in the template view by clicking **View** button, on the template card.
## Attaching Existing Disks
You can attach existing disks with persisted data when provisioning a new GPU instance. This is particularly useful when you want to reuse datasets, models, or checkpoints stored on network-attached disks without re-uploading them.
### Finding Compatible GPUs
Before provisioning, use the [availability endpoint](./check-gpu-availability) with the `disks` filter to find GPU instances that can attach to your existing disks:
```bash theme={null}
curl --request GET \
--url 'https://api.primeintellect.ai/api/v1/availability/gpus?disks=clhxy6aw80000j8080gdf8kqv&gpu_type=H100_80GB' \
--header 'Authorization: Bearer your_api_key'
```
This returns only GPU offers available in the same location as your disk.
### Provisioning with Disks
To attach disks when creating an instance, add the `disks` array to your request body:
```bash theme={null}
curl --request POST \
--url https://api.primeintellect.ai/api/v1/pods/ \
--header 'Authorization: Bearer your_api_key' \
--header 'Content-Type: application/json' \
--data '{
"pod": {
"name": "Training instance with data",
"cloudId": "n3-H100x1",
"gpuType": "H100_80GB",
"socket": "PCIe",
"gpuCount": 1,
"image": "ubuntu_22_cuda_12",
"dataCenterId": "CANADA-1",
"security": "secure_cloud"
},
"provider": {
"type": "hyperstack"
},
"disks": ["clhxy6aw80000j8080gdf8kqv"]
}'
```
### Response
On successful provisioning, you'll receive a response with the instance details and attached disk information:
```json theme={null}
{
"id": "11de9260fb52451085f3936c20b0ffdb",
"userId": "clvb0itli0000oxevorvgrpfn",
"teamId": null,
"walletId": "clvb0iv0c0004oxev5mnt1xiv",
"name": "Training instance with data",
"providerType": "hyperstack",
"status": "PROVISIONING",
"installationStatus": "PENDING",
"installationFailure": null,
"installationProgress": null,
"createdAt": "2025-11-07T23:36:36.391000",
"updatedAt": "2025-11-07T23:36:36.418000",
"terminatedAt": null,
"gpuName": "H100_80GB",
"gpuCount": 1,
"socket": "PCIe",
"priceHr": 1.9,
"stoppedPriceHr": null,
"provisioningPriceHr": 0.0,
"environmentType": "ubuntu_22_cuda_12",
"customTemplateId": null,
"clusterId": null,
"primePortMapping": [
{
"internal": "22",
"external": "22",
"protocol": "TCP",
"usedBy": "SSH",
"description": "SSH access"
},
{
"internal": "*",
"external": "*",
"protocol": "TCP",
"usedBy": null,
"description": "All other ports"
}
],
"sshConnection": null,
"ip": null,
"resources": {
"memory": 180,
"disk": 1250,
"sharedDisk": null,
"vcpus": 28
},
"attachedResources": [
{
"resourceType": "DISK",
"id": "clhxy6aw80000j8080gdf8kqv",
"status": "UNATTACHED",
"isDetachable": true,
"mountPath": "/data",
"resourcePath": "/dev/vdc",
"size": 500,
"isShared": false
},
{
"resourceType": "DISK",
"id": "ephemeral",
"status": "ATTACHED",
"isDetachable": false,
"mountPath": "/ephemeral",
"resourcePath": "/dev/vdb",
"size": 750,
"isShared": false
}
],
"isSpot": null,
"autoRestart": null
}
```
The response includes:
* **`attachedResources`**: Array showing both your persistent disk (`clhxy6aw80000j8080gdf8kqv`) and the ephemeral instance disk
* **`resources.disk`**: Total disk space including both persistent and ephemeral storage (500GB + 750GB = 1250GB)
* **Disk status**: `UNATTACHED` initially, will become `ATTACHED` once the instance is fully provisioned, and then `MOUNTED` when disk it mounted to the working directory.
The persistent disk will be automatically attached and mounted at `/data` once the instance completes provisioning. The ephemeral disk is immediately available at `/ephemeral`.
### Multiple Disks
You can attach multiple disks to a single instance:
```bash theme={null}
curl --request POST \
--url https://api.primeintellect.ai/api/v1/pods/ \
--header 'Authorization: Bearer your_api_key' \
--header 'Content-Type: application/json' \
--data '{
"pod": {
"name": "Multi-disk training",
"cloudId": "n3-H100x1",
"gpuType": "H100_80GB",
"socket": "PCIe",
"gpuCount": 1,
"image": "ubuntu_22_cuda_12",
"dataCenterId": "CANADA-1",
"country": "CA",
"security": "secure_cloud"
},
"provider": {
"type": "hyperstack"
},
"disks": [
"clhxy6aw80000j8080gdf8kqv",
"clhxy9bz50001j8080hdf9lrw"
]
}'
```
### Use Cases
* **Training with Large Datasets**: Attach disks containing preprocessed training data
* **Model Checkpointing**: Resume training from checkpoints stored on persistent disks
* **Shared Data Access**: Use multi-node compatible disks across multiple instances
* **Spot Instances**: Keeping your data when running spot instances
- Only disks you own can be attached to your instances
- Disks must be in an `ACTIVE` state
- Some providers may have limitations on the number of disks that can be attached