> ## Documentation Index
> Fetch the complete documentation index at: https://docs.primeintellect.ai/llms.txt
> Use this file to discover all available pages before exploring further.
# Slurm Orchestration
> Deploy and manage multi-node clusters with Slurm workload orchestration on Prime Intellect Platform.
Slurm is a powerful, open-source workload manager and job scheduler designed for high-performance computing clusters. When you deploy a multi-node cluster with Slurm on Prime Intellect, you get a fully configured orchestration system with shared storage for seamless distributed computing.
# Deploy a Slurm Cluster
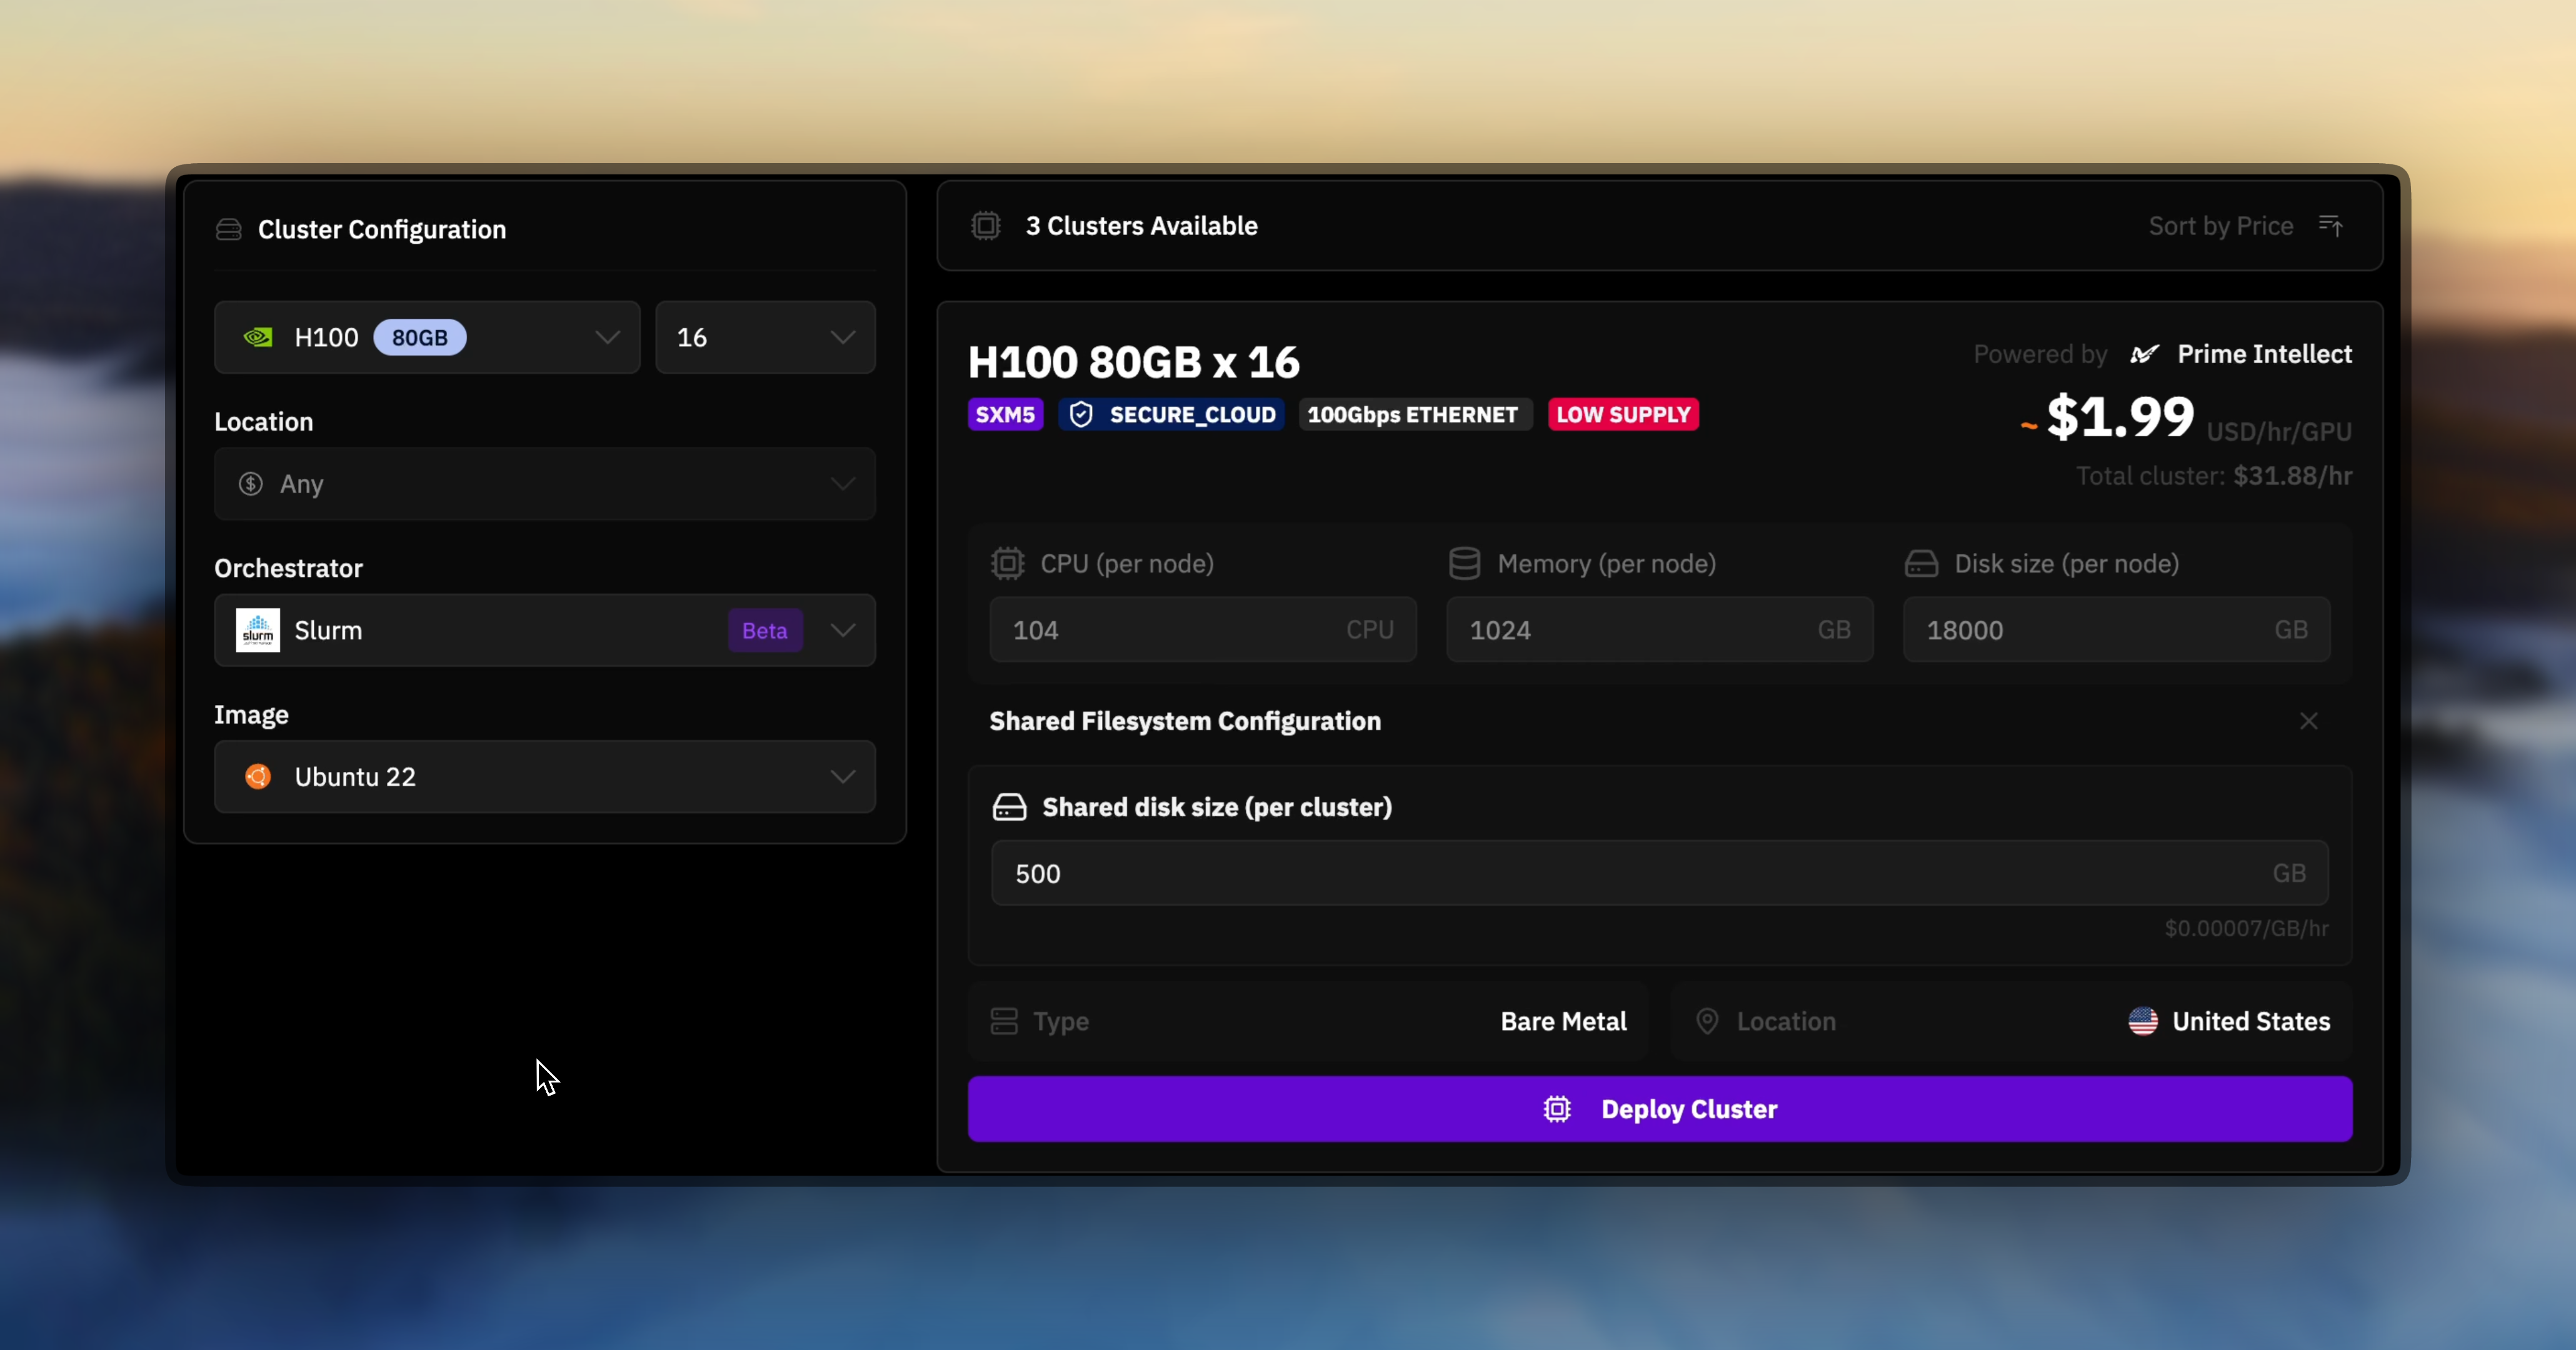
Navigate to the Multi-Node Cluster tab and select a cluster configuration with shared storage attached. Choose Slurm as your orchestrator during the deployment process.
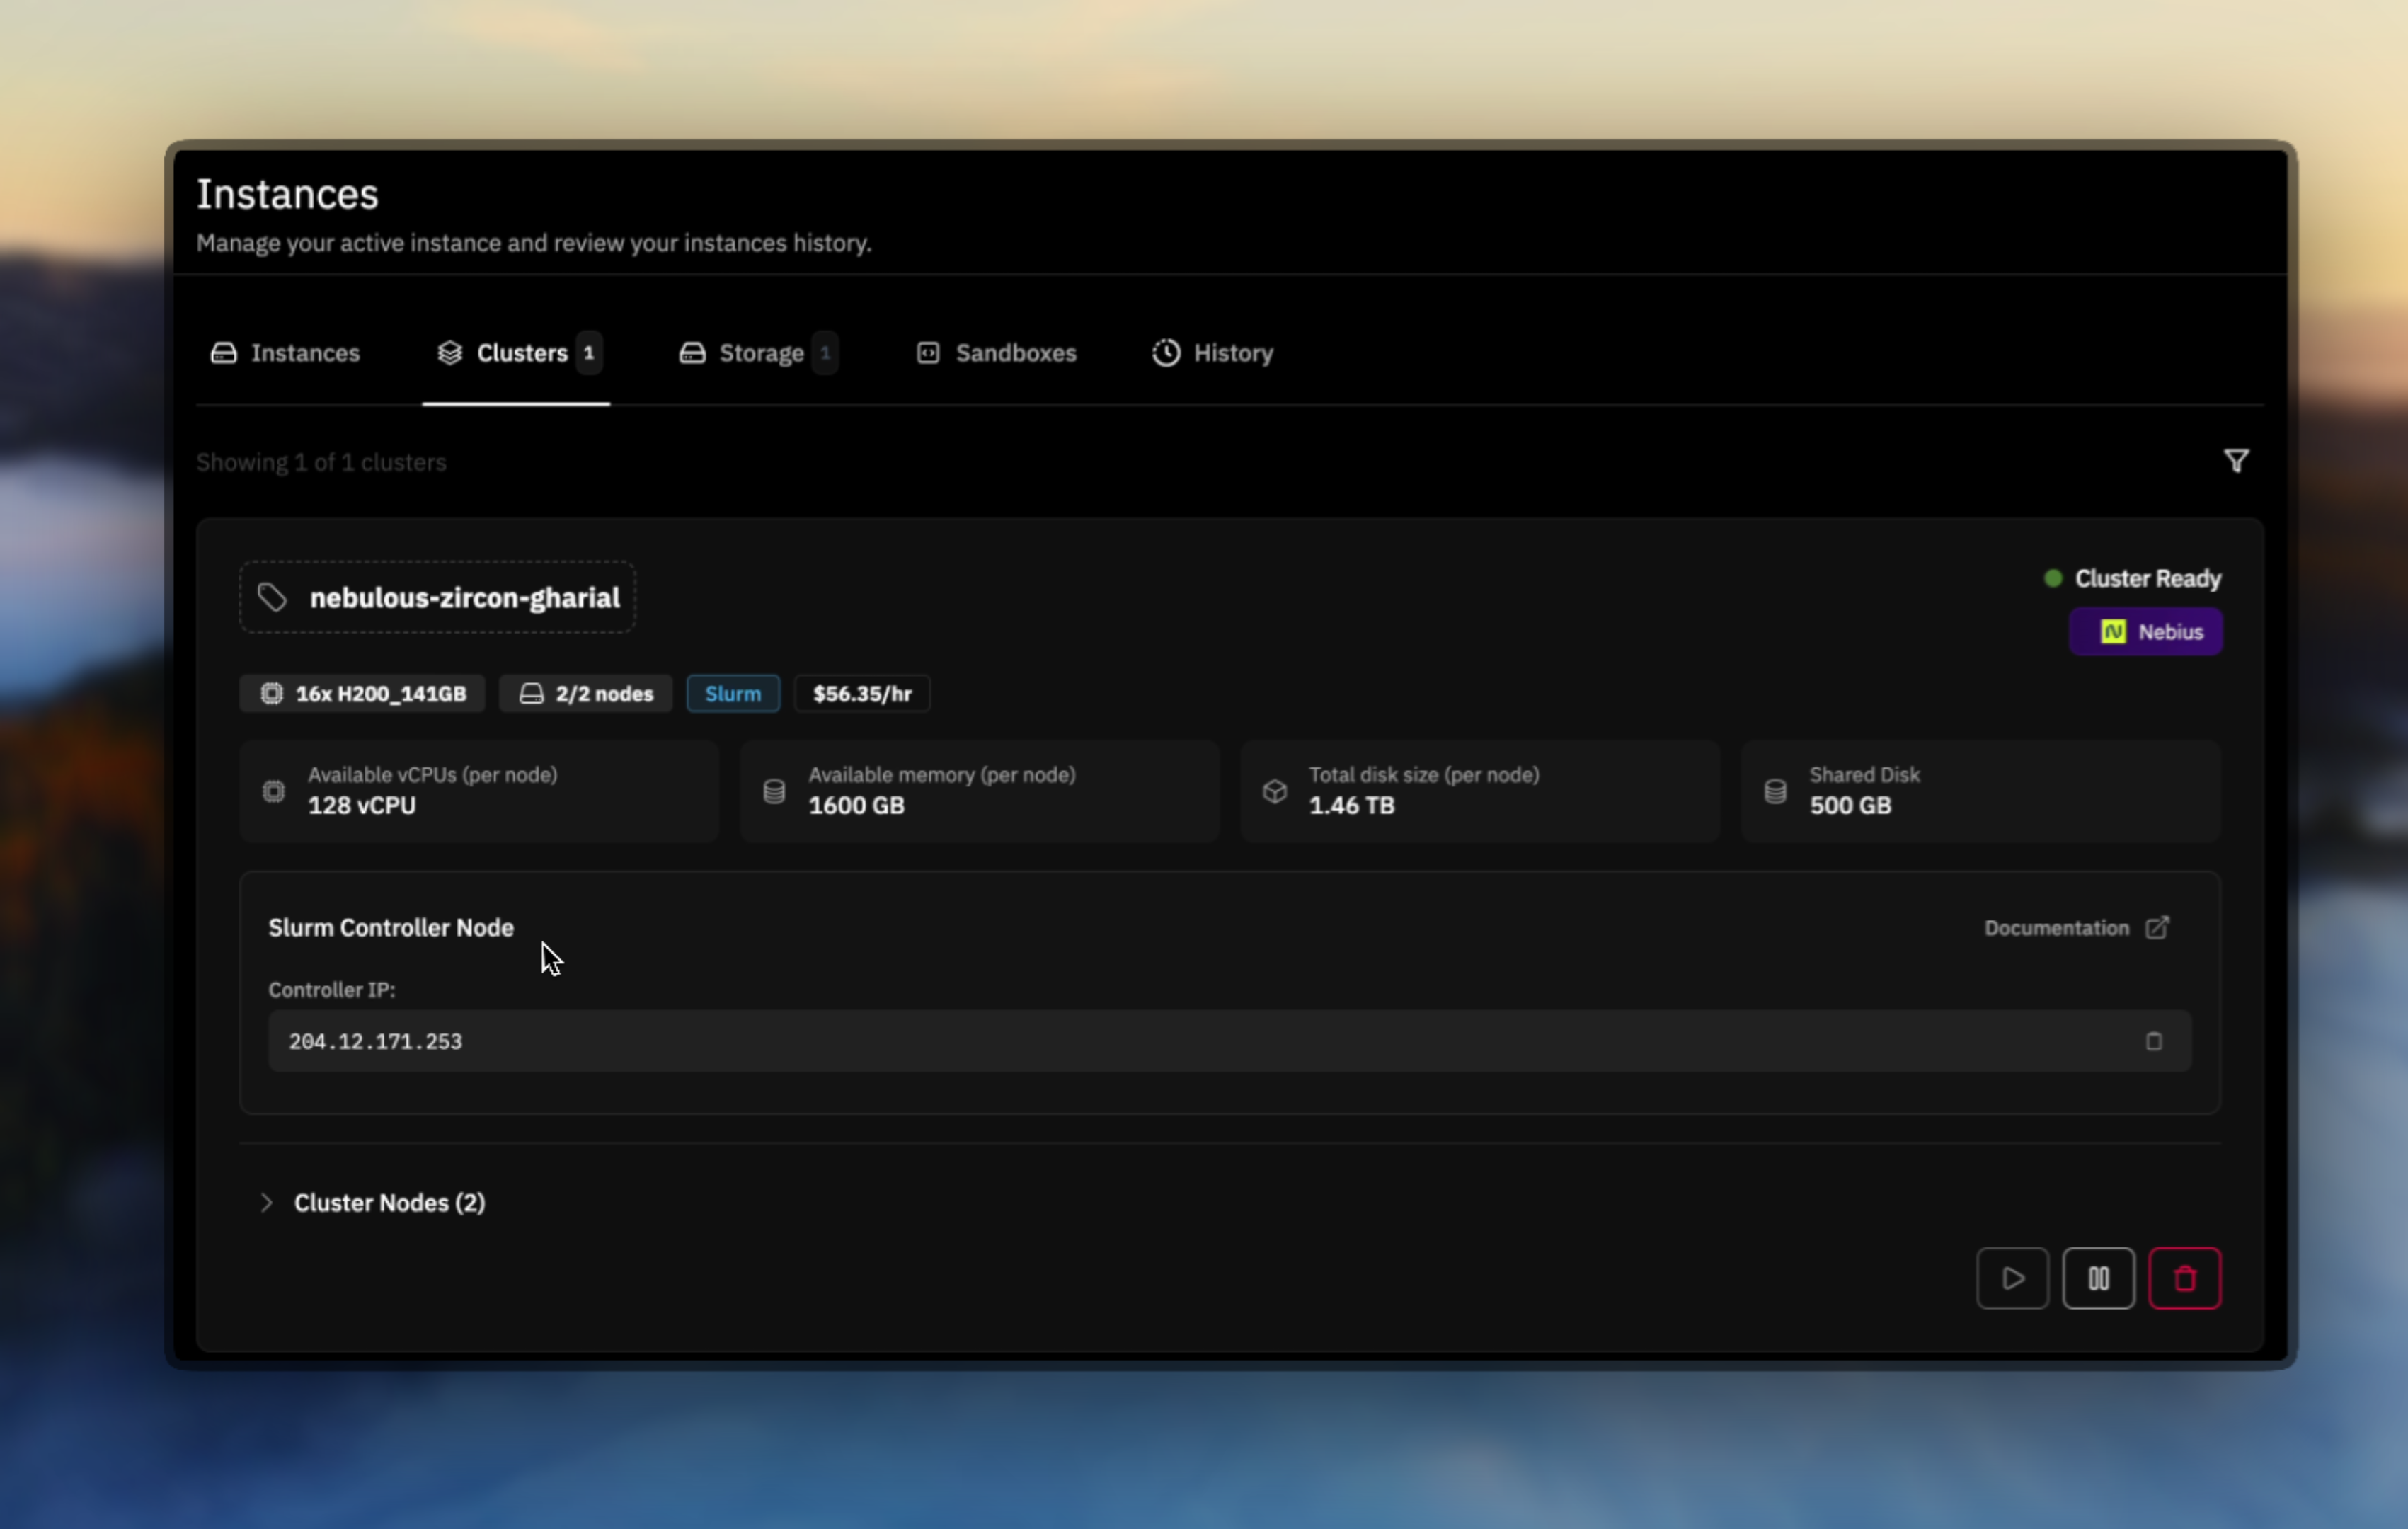
 Once the cluster is deployed, the UI displays the controller IP address. Always connect to the controller node to issue Slurm commands - this is your main management interface for the entire cluster.
 ```bash theme={null}
ssh ubuntu@
```
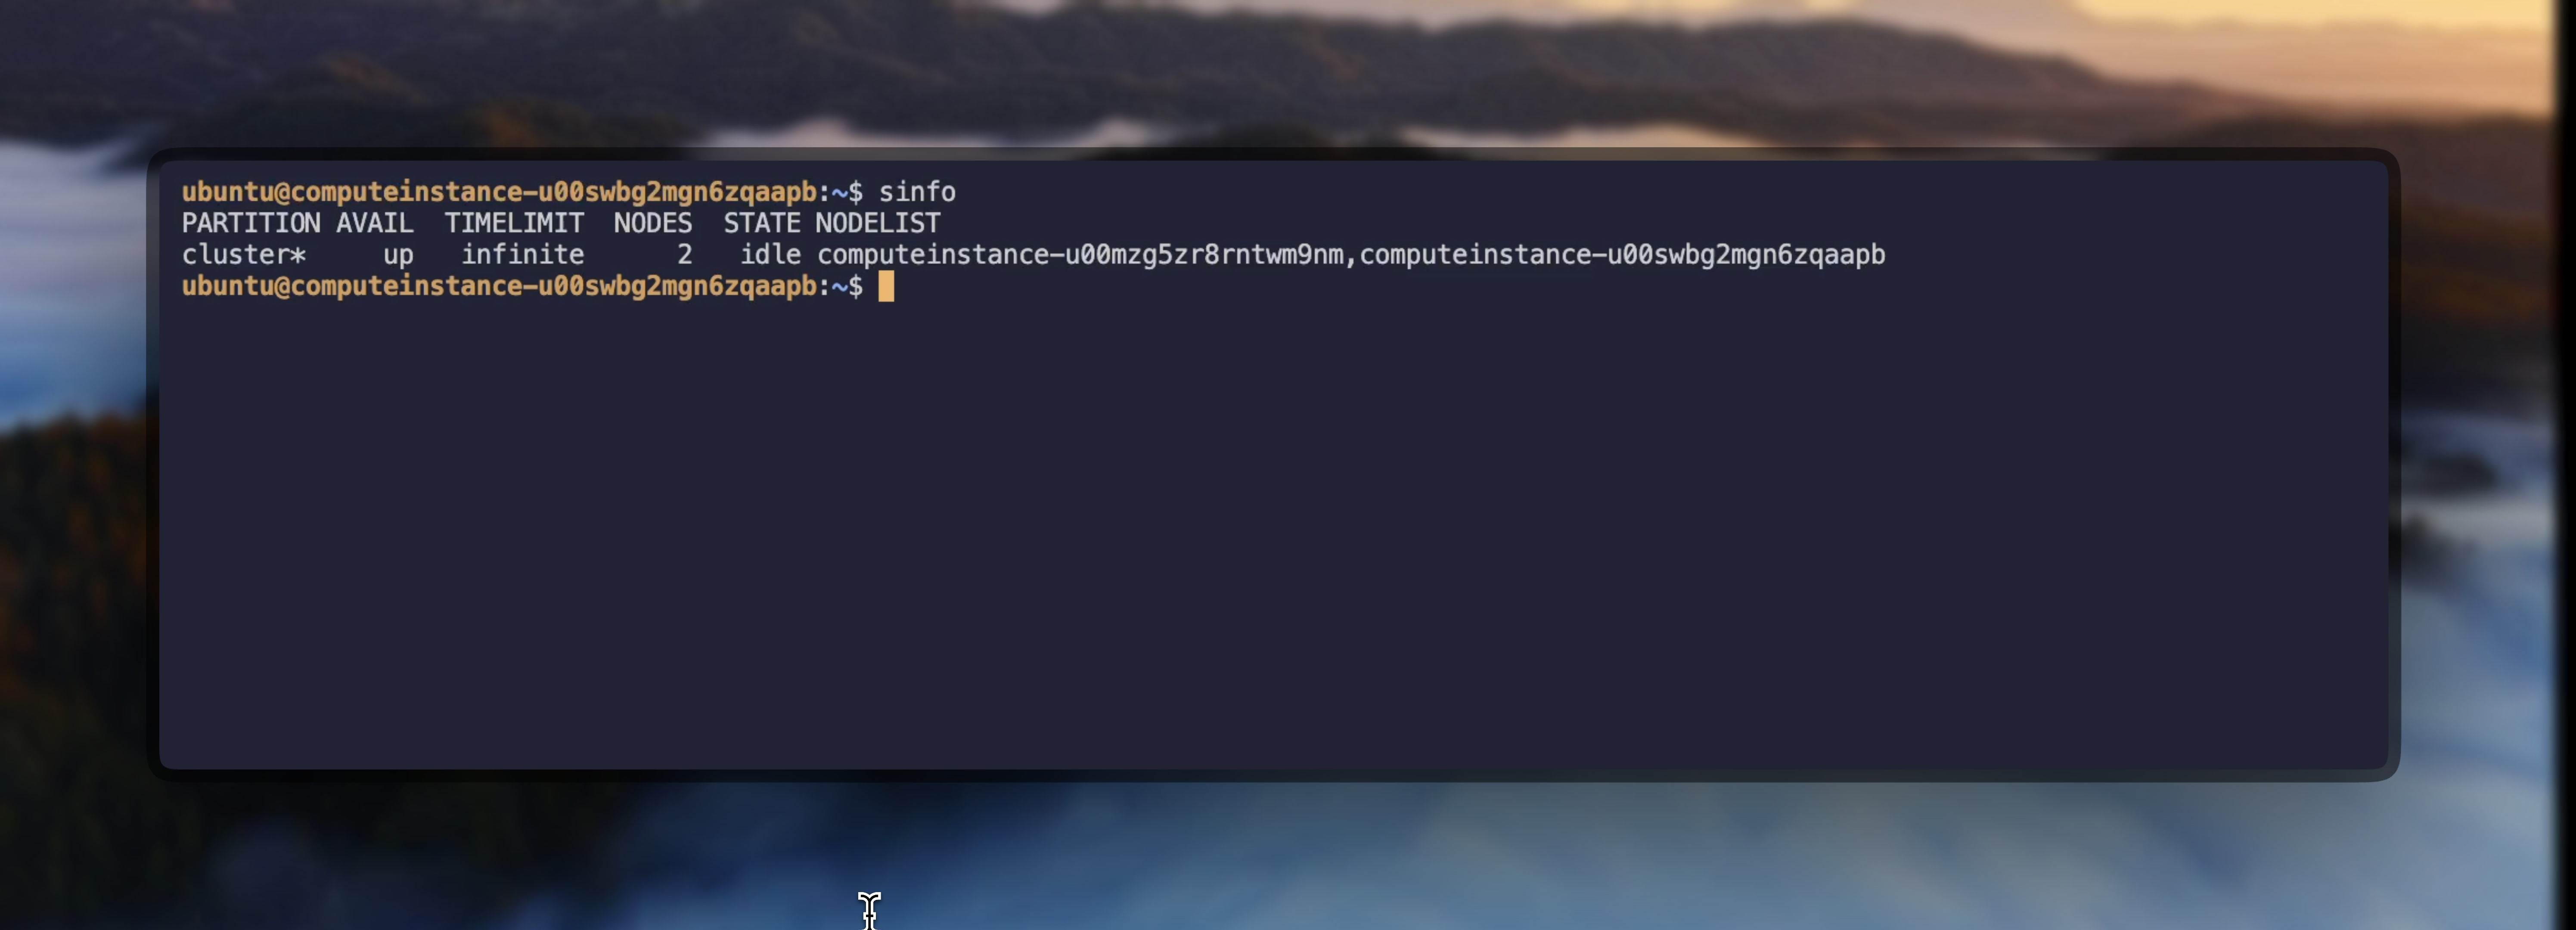
After connecting to the controller, verify your Slurm cluster is properly configured and all nodes are available.
```bash theme={null}
ssh ubuntu@
```
After connecting to the controller, verify your Slurm cluster is properly configured and all nodes are available.
 # Essential Slurm Commands
Once connected to the controller node, you can use these Slurm commands to manage your cluster:
## View Cluster Information
```bash theme={null}
# Display information about nodes and partitions
sinfo
# Show detailed node information
sinfo -Nel
# Display partition summary
sinfo -s
# Example output:
# PARTITION AVAIL TIMELIMIT NODES STATE NODELIST
# gpu* up infinite 2 idle node[001-002]
```
## GPU Resource Allocation
Prime Intellect clusters use the Generic Resource (GRES) system for GPU allocation. Understanding the correct syntax is crucial for successful job submission.
### Interactive GPU Sessions
```bash theme={null}
# Request an interactive session with GPUs (use --gres for batch scripts)
srun --gpus=1 --pty bash
# Request multiple GPUs across nodes
srun --nodes=2 --gpus-per-node=8 nvidia-smi
# Request specific node with GPUs
srun --gpus=4 --nodelist=node001 --pty bash
# Alternative GRES syntax (required for batch scripts)
srun --nodes=2 --gres=gpu:8 --ntasks-per-node=1 nvidia-smi
# Once in the session, verify GPU access
nvidia-smi
# Check available GPUs in your session
nvidia-smi -L
```
When writing batch scripts, always use `--gres=gpu:N` instead of `--gpus-per-node=N` to avoid InvalidAccount errors.
## Batch Job Submission
Batch jobs allow you to queue work that runs without manual intervention. Create a script file (e.g., `job.sh`) with SBATCH directives:
### Basic GPU Job Script
```bash theme={null}
#!/bin/bash
#SBATCH --job-name=gpu-test
#SBATCH --nodes=2
#SBATCH --gres=gpu:8 # IMPORTANT: Use gres for GPUs in batch scripts
#SBATCH --ntasks-per-node=1
#SBATCH --time=01:00:00
#SBATCH --output=%x-%j.out # %x=job-name, %j=job-id
#SBATCH --error=%x-%j.err
echo "Job started on $(date)"
echo "Running on nodes: $SLURM_JOB_NODELIST"
# Run nvidia-smi on all allocated nodes
srun -l nvidia-smi
# Your training or compute commands here
# srun python train.py
```
### Submit and Manage Jobs
```bash theme={null}
# Submit a batch job
sbatch job.sh
# View queued and running jobs
squeue
# View your jobs only
squeue -u $USER
# Cancel a job
scancel
# Cancel all your jobs
scancel -u $USER
# View detailed job information
scontrol show job
```
### Job Output Location
Job output files are written to the directory where `sbatch` was executed, which may be on the compute node's local filesystem if you're not in shared storage. Always submit jobs from the shared storage directory to ensure output accessibility.
## Example: Quick Cluster Test
Verify your Slurm cluster with these simple tests:
```bash theme={null}
# Test 1: Check all GPUs across nodes (interactive)
srun --nodes=2 --gpus-per-node=8 nvidia-smi
# Test 2: Verify task distribution across nodes
srun --nodes=2 --ntasks-per-node=2 hostname
# Test 3: Check task distribution
srun --nodes=2 --ntasks-per-node=2 bash -c 'echo "Task $SLURM_PROCID running on node $(hostname)"'
```
# Troubleshooting Common Issues
## InvalidAccount Error
If you encounter `InvalidAccount` errors when submitting batch jobs:
1. **Use correct GPU syntax**: In batch scripts, always use `--gres=gpu:N` instead of `--gpus-per-node=N`
2. **No accounting plugin**: Prime Intellect clusters intentionally don't use Slurm's accounting plugin since clusters are single-tenant with dedicated resources. Remove any `#SBATCH --account=` directives from your scripts
3. **Check partition availability**: Ensure the partition you're requesting exists with `sinfo`
Prime Intellect clusters run without the Slurm accounting plugin because each cluster is single-tenant with dedicated resources. This simplifies configuration and eliminates account-based resource restrictions, giving you full access to all allocated resources without quota management overhead.
### Incorrect (causes InvalidAccount)
```bash theme={null}
#!/bin/bash
#SBATCH --gpus-per-node=8 # Wrong for batch scripts
```
### Correct
```bash theme={null}
#!/bin/bash
#SBATCH --gres=gpu:8 # Correct for batch scripts
```
## Job Output Not Found
If you can't find your job output files:
* **Check working directory**: Output files are created where `sbatch` was run
* **Use absolute paths**: Specify full paths in `--output` and `--error` directives
* **Check other nodes**: If submitted from a compute node, outputs may be on that node's local storage
* **Always submit from shared storage**: Change to the shared storage directory before running `sbatch`
## Node Communication Issues
If nodes can't communicate or jobs hang:
* Verify all nodes are in `idle` state with `sinfo`
* Check node connectivity: `srun --nodelist= hostname`
* Ensure shared storage is mounted on all nodes
* Consider restarting your cluster if issues persist
# Advanced Slurm Commands
## Direct Node Access
Access specific compute nodes directly for debugging or monitoring:
```bash theme={null}
# SSH into a specific node via srun
srun --nodelist=computeinstance-abc123 --pty bash
# Run commands on specific nodes
srun --nodelist=node001,node002 hostname
# Allocate resources without running a command
salloc --nodes=2 --gres=gpu:8 --time=01:00:00
# Then use srun within the allocation
srun nvidia-smi
```
## Resource Monitoring
```bash theme={null}
# View detailed node status
scontrol show node
# Check GPU allocation
scontrol show node | grep -E "NodeName|Gres"
# Monitor job efficiency
seff
# View job accounting information
sacct -j --format=JobID,JobName,Partition,Account,AllocCPUS,State,ExitCode
# Check cluster utilization
sreport cluster utilization
```
## Job Arrays for Parameter Sweeps
Run multiple similar jobs with different parameters:
```bash theme={null}
#!/bin/bash
#SBATCH --job-name=param-sweep
#SBATCH --array=1-10
#SBATCH --gres=gpu:1
#SBATCH --output=sweep_%A_%a.out # %A=array job ID, %a=array task ID
# Use SLURM_ARRAY_TASK_ID for different parameters
python train.py --seed=$SLURM_ARRAY_TASK_ID --lr=$(echo "0.001 * $SLURM_ARRAY_TASK_ID" | bc)
```
## Environment Variables
Useful Slurm environment variables available in jobs:
```bash theme={null}
echo "Job ID: $SLURM_JOB_ID"
echo "Job Name: $SLURM_JOB_NAME"
echo "Node List: $SLURM_JOB_NODELIST"
echo "Number of Nodes: $SLURM_JOB_NUM_NODES"
echo "Tasks per Node: $SLURM_NTASKS_PER_NODE"
echo "CPUs per Task: $SLURM_CPUS_PER_TASK"
echo "Submit Directory: $SLURM_SUBMIT_DIR"
echo "Task ID: $SLURM_PROCID"
echo "Node ID: $SLURM_NODEID"
```
# Shared Storage Integration
Your Slurm cluster comes with shared storage automatically mounted on all nodes. The UI displays the mount path for your shared storage directory. This ensures:
* Consistent file access across all compute nodes
* No need to manually copy data between nodes
* Simplified job submission and management
* Persistent storage for checkpoints and results
## Best Practices
Always submit jobs and run Slurm commands from the controller node, not compute nodes
Store your code, data, and outputs in the shared storage directory shown in the UI for seamless access across nodes
Regularly check cluster utilization with `sinfo` and `squeue` to optimize job scheduling
For parameter sweeps or similar tasks, use Slurm job arrays for efficient scheduling
# Essential Slurm Commands
Once connected to the controller node, you can use these Slurm commands to manage your cluster:
## View Cluster Information
```bash theme={null}
# Display information about nodes and partitions
sinfo
# Show detailed node information
sinfo -Nel
# Display partition summary
sinfo -s
# Example output:
# PARTITION AVAIL TIMELIMIT NODES STATE NODELIST
# gpu* up infinite 2 idle node[001-002]
```
## GPU Resource Allocation
Prime Intellect clusters use the Generic Resource (GRES) system for GPU allocation. Understanding the correct syntax is crucial for successful job submission.
### Interactive GPU Sessions
```bash theme={null}
# Request an interactive session with GPUs (use --gres for batch scripts)
srun --gpus=1 --pty bash
# Request multiple GPUs across nodes
srun --nodes=2 --gpus-per-node=8 nvidia-smi
# Request specific node with GPUs
srun --gpus=4 --nodelist=node001 --pty bash
# Alternative GRES syntax (required for batch scripts)
srun --nodes=2 --gres=gpu:8 --ntasks-per-node=1 nvidia-smi
# Once in the session, verify GPU access
nvidia-smi
# Check available GPUs in your session
nvidia-smi -L
```
When writing batch scripts, always use `--gres=gpu:N` instead of `--gpus-per-node=N` to avoid InvalidAccount errors.
## Batch Job Submission
Batch jobs allow you to queue work that runs without manual intervention. Create a script file (e.g., `job.sh`) with SBATCH directives:
### Basic GPU Job Script
```bash theme={null}
#!/bin/bash
#SBATCH --job-name=gpu-test
#SBATCH --nodes=2
#SBATCH --gres=gpu:8 # IMPORTANT: Use gres for GPUs in batch scripts
#SBATCH --ntasks-per-node=1
#SBATCH --time=01:00:00
#SBATCH --output=%x-%j.out # %x=job-name, %j=job-id
#SBATCH --error=%x-%j.err
echo "Job started on $(date)"
echo "Running on nodes: $SLURM_JOB_NODELIST"
# Run nvidia-smi on all allocated nodes
srun -l nvidia-smi
# Your training or compute commands here
# srun python train.py
```
### Submit and Manage Jobs
```bash theme={null}
# Submit a batch job
sbatch job.sh
# View queued and running jobs
squeue
# View your jobs only
squeue -u $USER
# Cancel a job
scancel
# Cancel all your jobs
scancel -u $USER
# View detailed job information
scontrol show job
```
### Job Output Location
Job output files are written to the directory where `sbatch` was executed, which may be on the compute node's local filesystem if you're not in shared storage. Always submit jobs from the shared storage directory to ensure output accessibility.
## Example: Quick Cluster Test
Verify your Slurm cluster with these simple tests:
```bash theme={null}
# Test 1: Check all GPUs across nodes (interactive)
srun --nodes=2 --gpus-per-node=8 nvidia-smi
# Test 2: Verify task distribution across nodes
srun --nodes=2 --ntasks-per-node=2 hostname
# Test 3: Check task distribution
srun --nodes=2 --ntasks-per-node=2 bash -c 'echo "Task $SLURM_PROCID running on node $(hostname)"'
```
# Troubleshooting Common Issues
## InvalidAccount Error
If you encounter `InvalidAccount` errors when submitting batch jobs:
1. **Use correct GPU syntax**: In batch scripts, always use `--gres=gpu:N` instead of `--gpus-per-node=N`
2. **No accounting plugin**: Prime Intellect clusters intentionally don't use Slurm's accounting plugin since clusters are single-tenant with dedicated resources. Remove any `#SBATCH --account=` directives from your scripts
3. **Check partition availability**: Ensure the partition you're requesting exists with `sinfo`
Prime Intellect clusters run without the Slurm accounting plugin because each cluster is single-tenant with dedicated resources. This simplifies configuration and eliminates account-based resource restrictions, giving you full access to all allocated resources without quota management overhead.
### Incorrect (causes InvalidAccount)
```bash theme={null}
#!/bin/bash
#SBATCH --gpus-per-node=8 # Wrong for batch scripts
```
### Correct
```bash theme={null}
#!/bin/bash
#SBATCH --gres=gpu:8 # Correct for batch scripts
```
## Job Output Not Found
If you can't find your job output files:
* **Check working directory**: Output files are created where `sbatch` was run
* **Use absolute paths**: Specify full paths in `--output` and `--error` directives
* **Check other nodes**: If submitted from a compute node, outputs may be on that node's local storage
* **Always submit from shared storage**: Change to the shared storage directory before running `sbatch`
## Node Communication Issues
If nodes can't communicate or jobs hang:
* Verify all nodes are in `idle` state with `sinfo`
* Check node connectivity: `srun --nodelist= hostname`
* Ensure shared storage is mounted on all nodes
* Consider restarting your cluster if issues persist
# Advanced Slurm Commands
## Direct Node Access
Access specific compute nodes directly for debugging or monitoring:
```bash theme={null}
# SSH into a specific node via srun
srun --nodelist=computeinstance-abc123 --pty bash
# Run commands on specific nodes
srun --nodelist=node001,node002 hostname
# Allocate resources without running a command
salloc --nodes=2 --gres=gpu:8 --time=01:00:00
# Then use srun within the allocation
srun nvidia-smi
```
## Resource Monitoring
```bash theme={null}
# View detailed node status
scontrol show node
# Check GPU allocation
scontrol show node | grep -E "NodeName|Gres"
# Monitor job efficiency
seff
# View job accounting information
sacct -j --format=JobID,JobName,Partition,Account,AllocCPUS,State,ExitCode
# Check cluster utilization
sreport cluster utilization
```
## Job Arrays for Parameter Sweeps
Run multiple similar jobs with different parameters:
```bash theme={null}
#!/bin/bash
#SBATCH --job-name=param-sweep
#SBATCH --array=1-10
#SBATCH --gres=gpu:1
#SBATCH --output=sweep_%A_%a.out # %A=array job ID, %a=array task ID
# Use SLURM_ARRAY_TASK_ID for different parameters
python train.py --seed=$SLURM_ARRAY_TASK_ID --lr=$(echo "0.001 * $SLURM_ARRAY_TASK_ID" | bc)
```
## Environment Variables
Useful Slurm environment variables available in jobs:
```bash theme={null}
echo "Job ID: $SLURM_JOB_ID"
echo "Job Name: $SLURM_JOB_NAME"
echo "Node List: $SLURM_JOB_NODELIST"
echo "Number of Nodes: $SLURM_JOB_NUM_NODES"
echo "Tasks per Node: $SLURM_NTASKS_PER_NODE"
echo "CPUs per Task: $SLURM_CPUS_PER_TASK"
echo "Submit Directory: $SLURM_SUBMIT_DIR"
echo "Task ID: $SLURM_PROCID"
echo "Node ID: $SLURM_NODEID"
```
# Shared Storage Integration
Your Slurm cluster comes with shared storage automatically mounted on all nodes. The UI displays the mount path for your shared storage directory. This ensures:
* Consistent file access across all compute nodes
* No need to manually copy data between nodes
* Simplified job submission and management
* Persistent storage for checkpoints and results
## Best Practices
Always submit jobs and run Slurm commands from the controller node, not compute nodes
Store your code, data, and outputs in the shared storage directory shown in the UI for seamless access across nodes
Regularly check cluster utilization with `sinfo` and `squeue` to optimize job scheduling
For parameter sweeps or similar tasks, use Slurm job arrays for efficient scheduling